

Issues with the Outlook 2016 Search
A new version of Outlook does not always mean new problems. Nevertheless, it has become clear in recent years that new features often bring new difficulties that must be resolved first. Often, changes to the settings are sufficient for this purpose. This article aims to provide an overview of the most common issues you may encounter with various versions and especially with Outlook 2016.
Problems with the Outlook 2016 Search Index
Do you need more search features than Outlook 2016 can offer? Try this add-in!
The Outlook search is undoubtedly one of the most important tools of the email client. If the Outlook search causes problems or stops working, this usually has a direct impact on your daily work. The issues can involve a variety of malfunctions, each of which must be resolved in a different way. For example, the search might fail completely and no longer return any results. It is also possible that results are only displayed up to a certain date or that files are still waiting to be indexed. If one of the listed points applies to you, the problem usually lies in the indexing of your files. The benefits of a search index are explained in this article.
One of the most common problems with the Outlook search is indexing errors. You should therefore first check whether your mailbox is being indexed at all. Indexing ensures that all files (in this case, emails) are cataloged so that they can be accessed quickly.
Check Indexing
It is quite easy to check whether your Outlook 2016 inbox is being indexed. To find out which locations you are indexing in Outlook 2016, simply follow these steps:
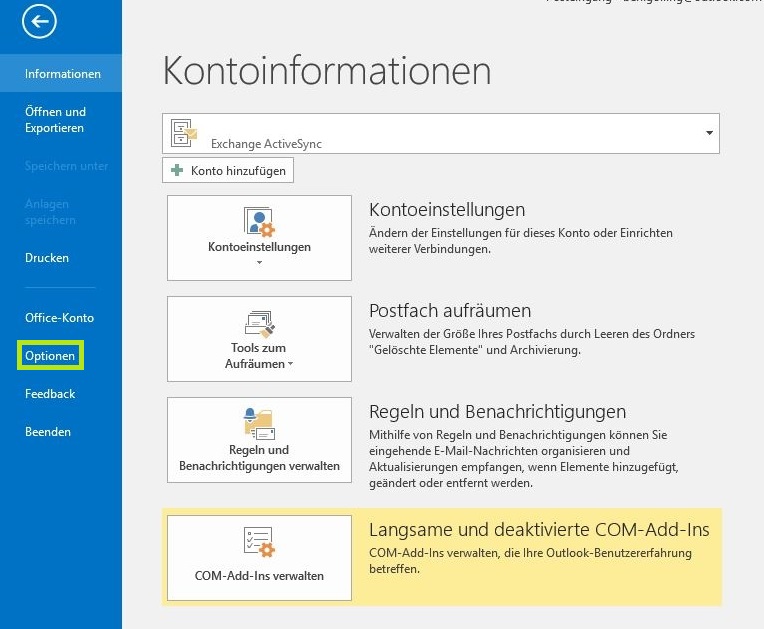
- Click the “File” ribbon in your Microsoft Outlook client.
- A pop-up will appear where you need to find the “Options” sub-item on the left. After clicking “Options”, a new window named “Outlook Options” will open.
- Under “Search”/“Browse”, you will find a gray-bordered field on the right labeled “Indexing Options…”. Clicking it opens a new window.

- Open the “Indexed Locations” window via “Change”.
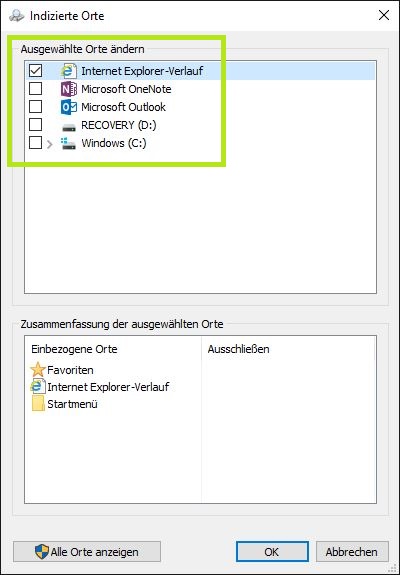
- If Microsoft Outlook is not selected in the list, check the box next to it. In versions prior to Outlook 2016, you can also select which PST files are indexed.
- Confirm with “OK”, “Close”, and again “OK” to close all windows and return to the Outlook start window.
If Outlook or the corresponding PST file is already indexed, it is recommended that you remove it from the index for a few minutes and then add it back. To do this, proceed as follows:
- Uncheck the box next to the corresponding file.
- Close Outlook and ensure that the Outlook.exe process is no longer displayed in the Task Manager (terminate it if necessary).
- Wait approximately 5 minutes.
- Repeat the steps above to add the file back to the index.
Repair PST Files Using scanpst.exe
If your PST file is corrupted in Outlook 2016, the Outlook search may cause problems because it cannot correctly access the stored data. You should check whether your PST file needs to be repaired.
Microsoft Office provides the scanpst.exe program, which you can find either via Windows Search or directly in the folder directory. Up to Outlook 2010, scanpst.exe is located at the path C:\Program Files (x86)\Microsoft Office\OfficeXY\SCANPST.EXE. For Outlook 2013 and Outlook 2016, it is located under C:\Programme (x86)\Microsoft Office/root/OfficeXY (on 32-bit systems, the same directory is under C:\Programme…).Start scanpst.exe as soon as you have found the file. The program scans your PST files for errors. If the number of items to be indexed does not change even after a longer period, scanpst.exe could not directly solve your problem. Keep scanpst.exe running and try to remove the PST file causing problems from the index and add it back as described above:
After re-adding it, the status in scanpst.exe should change to „0 items remaining“. If this is not the case, it is advisable to completely rebuild your index.
Delete and Rebuild Outlook 2016 Index
- Return to the Outlook „Indexing Options“.

- Click on „Advanced“ to open the „Advanced Options“.
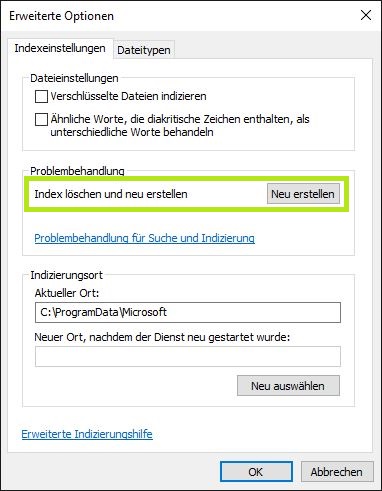
- Under the sub-item „Troubleshooting“, you can have the index deleted and rebuilt.
This process can sometimes take a very long time and significantly impact your computer’s performance. It is advisable to only have the new index created when you have enough time (e.g., overnight). Ultimately, this should resolve your Outlook search issues.



Comments