

Outlook 2016 Search is Not Working
Outlook 2016 has been on the market for two years now. Even though the latest version of Microsoft’s email client improves upon its predecessors in many ways, users still have to deal with known issues. When the Outlook 2016 search no longer works correctly or fails completely, this often has negative consequences for those affected. However, you don’t always need a computer technician to fix every functional error. Learn in this article how you can easily resolve the most common Outlook errors.
Article title: Outlook 2016 Search Not Working Excerpt 1 of 2: Do you want a reliable Outlook search that you can also use on your desktop? Then Lookeen is exactly the right tool for you!
Common Outlook 2016 Issues
Many issues can occur with Outlook search. Each must be resolved in its own specific way. Nevertheless, some problems are significantly more common on average than others. Often, the Outlook search fails completely or simply stops displaying any results. Other known errors include results only being shown up to a certain date, or files not being fully indexed. These errors usually share a common cause. If one of these errors occurs in your version of Outlook, the problem is likely related to the indexing of your files.
Indexing errors are among the most common reasons why the email client no longer functions properly. This makes it sensible to rule out the simplest issues first. Therefore, you should check whether your mailbox is being indexed at all. Indexing serves to determine the exact location of your files so that they can be accessed quickly during a search. You can imagine the principle like an index in a binder: Under each letter or file reference number, all data starting with that corresponding character is stored. Instead of having to search through the entire binder anew with every search, a quick glance at the relevant section is sufficient.
How to Check Outlook Indexing
If the Outlook 2016 search is not working, the easiest approach is therefore to check the index first:
-
To do this, click on the Ribbon tab „File“ in Outlook.
-
A pop-up will appear where you can find the sub-item “Options” on the left. After clicking “Options”, a new window titled “Outlook Options” will open.
-
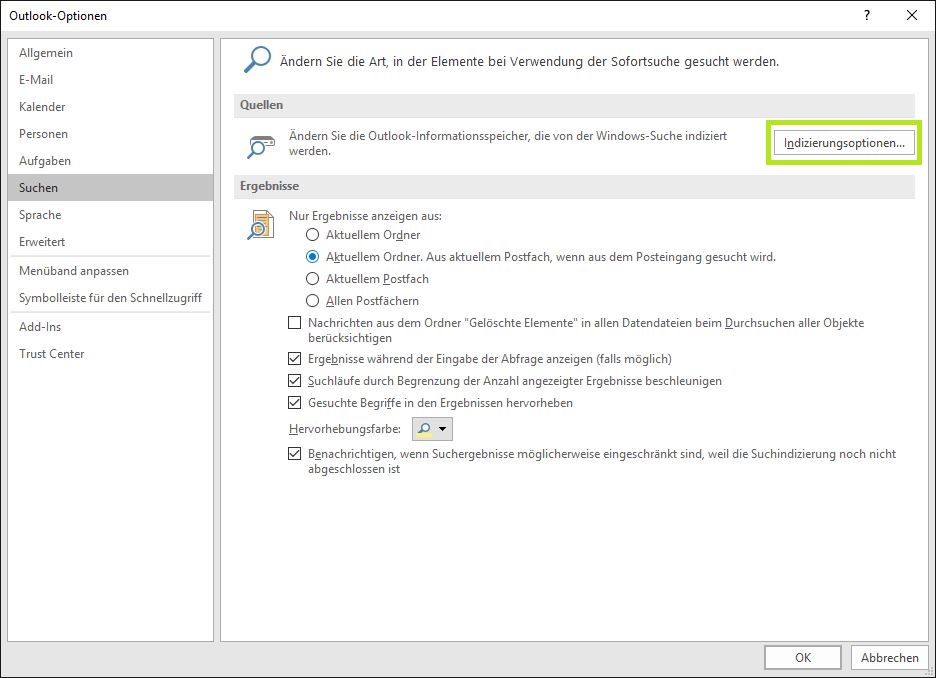
Under “Search”/“Browse”, you will find a gray-bordered field on the right side labeled “Indexing Options…”. Click on it.
-
Via “Change”, you must now open “Indexed Locations”.
-
A list will open showing all locations indexed by Outlook. If “Microsoft Outlook” is not selected, check the box next to it.
-
Confirm your change with “OK” and close the open windows.
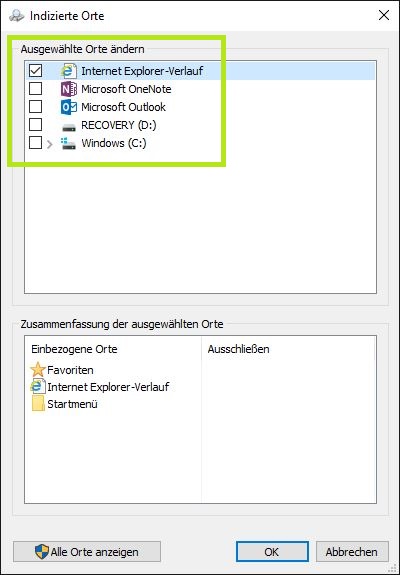
If “Microsoft Outlook” was already marked as indexed, you should uncheck it, confirm with “OK”, and wait a few minutes before checking it again. There are a few minor points to consider when doing this, so proceed as follows:
-
Uncheck the box next to “Microsoft Outlook”.
-
Close Outlook and ensure that “Outlook.exe” is no longer displayed in the Task Manager (“CTRL”+“ALT”+“DEL”) under “Processes” (if necessary, end it by right-clicking – “End Task”).
-
Wait at least five minutes.
-
Add “Microsoft Outlook” back to the index.
Repairing PST Files Using scanpst.exe
The problem might not be with the index at all, but rather with your PST file. This is a file type that Outlook uses to store your files. If your PST file is corrupted, it can cause issues for Outlook search because it cannot correctly access the stored data.
Microsoft Office provides the tool scanpst.exe for checking PST files, which you can find either using Windows Search or directly in the folder directory. Since Outlook 2013, scanpst.exe is located under C:\Programme (x86)\Microsoft Office/root/OfficeXY (on 32-bit systems under C:\Programme…).After you have started scanpst.exe, the tool will search your PST files for errors. If the number of items to be indexed does not change even after a long time, scanpst.exe could not directly solve your problem. Nevertheless, let scanpst.exe continue running. However, remove the PST file where scanpst.exe has stalled from the index for five minutes, as you found described above for “Microsoft Outlook”.
After you have added the file back to the index, the status in scanpst.exe should change to “0 items remaining”. If this is not the case, you should delete your index and recreate it completely.
How to Delete Your Index and Recreate It
Sometimes it can help if you completely delete your index when dealing with indexing issues. Since this is a more extensive intervention, it is recommended to only do it when you do not need to work on your device at that moment.
-
Return to the “Indexing Options” of Outlook, as you already did when checking your indexing.
-
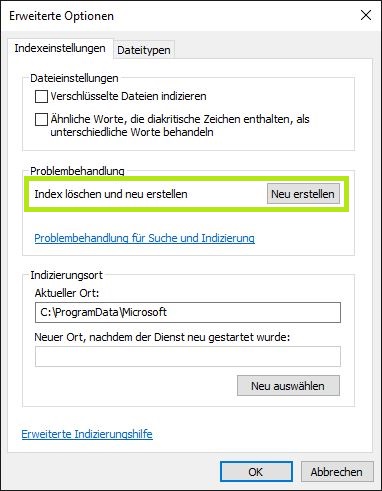
Click on “Advanced” now to open the “Advanced Options”.
-
Under the sub-item “Troubleshooting”, you can delete and recreate your index.



Comments