Where to find Windows Search
Over the years, Microsoft has made some changes to where the Windows Search Service is located, and has improved its functionality. In Windows XP and Windows Vista, the Windows Search Service, or desktop search, could be found by going through the Start button—so you would simply click on Start and then Search.
When Windows 7 became available, the Windows search service was slightly different. To get to the Windows Search Service you have to click the Start button and then select Documents. Once Documents opens up, you have to type the name of the file you are looking for into the search box at the top to search for it.
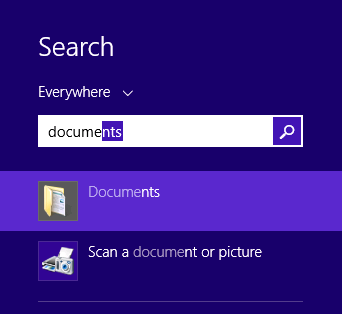
Major changes occurred when Windows 8 debuted. It was a completely new look for the Windows search service and instead of being able to reach the desktop search through the Start Menu, you have to swipe the screen to find it on the Charms Bar. Here’s how you find search on Windows 8:

- From the right edge of your screen, swipe in
- Now click on Search
- You can also access the search from the Start screen
- Type in what you are looking for and you should see search results and suggestions
In Windows 8 you can also use File Explorer. To get into File Explorer do this:
- Swipe in from the right edge again.
- Click search again, and type in File Explorer
- Click on File Explorer
- Now in the window type in the name of the file or folder you are searching for

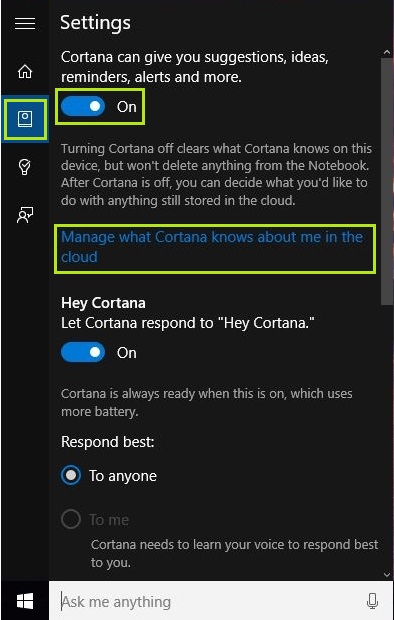
Microsoft changed things up once again with Windows 10 Search Service. You can use the search box on this version of Windows Search Service as well to open up File Explorer. With 10, you use File Explorer search like you do in 8, but now you also have Cortana, which can search your computer and the Internet for items you need. Cortana is known more as a personal assistant, and you can turn off Cortana if you’re worried about the amount of data Cortana collects. To turn Cortana off, follow these steps:

- Click on the Ring icon to open Cortana
- Click on the Notebook icon on the left hand side.
- Select Settings
- Slide the little button to off, below where it says “Cortana can give you suggestions, reminders, alerts and more”
- To change Cortana’s data permissions, click the link that says “Manage what Cortana knows about me in the cloud”
What Happens if the Windows Search Service is Turned Off?
Like many programs and features, Windows Search is a default function that is enabled from the get go. You can always turn off the Windows Search Service, but what exactly happens when you do that?
For starters, it can be hard to tell exactly what programs will be affected by this decision, and what really relies on Windows Search Service. The obvious is that the search boxes will all disappear from your desktop. Any program that relies on the Windows Search Service might have functionality issues (eg. Internet Explorer), and indexing will be removed from the Control Panel. This may also affect any third party search apps that depend on Windows’ own search index
If this is something you would still like to try, then you should learn the proper way to disable the Windows Search Service:
Disabling Windows Search Service
To disable search in Windows 7:
- Go to Start and then Control Panel
- Find Programs and Features
- On the left hand side click where it says “Turn Windows features on or off”
- Uncheck the box next to Windows Search in the list of items
- A message will appear asking if you are sure that you want to continue. Click Yes
- Now in the Windows Features window click OK
- You will now see a progress bar. When it is complete, you will need to restart your computer
Once these steps are followed you will notice that the Search Box will be gone from the start menu.
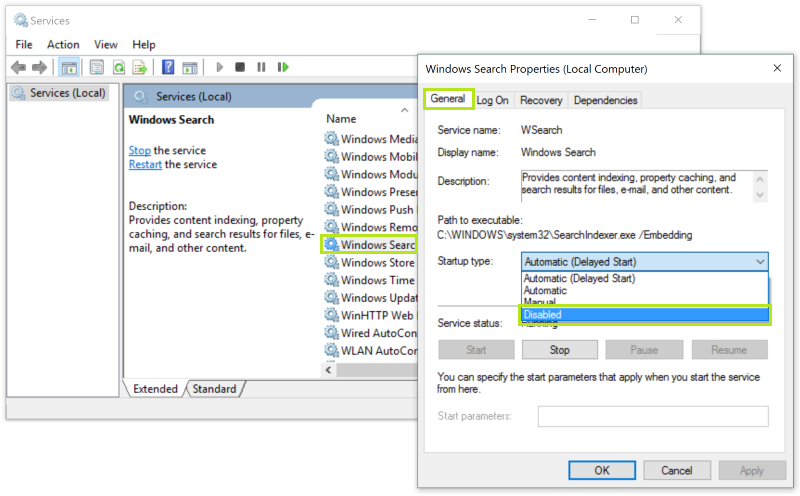
With Windows 8 or Windows 10 it is more about disabling the indexing, and as such, requires a different set of steps. Here’s what to do to disable search indexing in Windows 8 and 10:

- Press Windows key+R on your keyboard, which opens the Run dialog box
- Enter services.msc and then click OK
- This opens the Services window. Scroll down the list and then right click on Windows Search and choose Properties
- In the General tab within the properties window you will have to change the Startup type to disabled
- Click OK so that the changes are saved and you can exit.
The search function should now be disabled.
Now you know what exactly the Windows Search Service is, where you can find it, and how to disable it.


Leave a Reply