Many of the problems that arise while searching with Windows search do not actually stem from Windows search itself, but it could be the settings or search options are set up on your computer. How many times have you opened up the Windows search tool, typed in a word or maybe even a phrase, hoping the search results would show you exactly what you are looking for? It seems a simple enough task, but often the results come up empty and you’re left with the frustration of not finding a file you know is on your computer.
Not to worry – there are some very easy steps you can take to help improve your results. With a few simple tweaks to the search options, you will be able to turn up better search results, making your life just a little easier.
Advanced Search – Windows 7
The first step to better search results is changing the folder options. The reason for this is that the Windows search default settings do not search within the contents of your files, making the search results abysmal.
- Open the Windows 7 start menu and type in “folder options” and click on the first entry that shows up.
- In the Folder Options dialog box, click on the search tab. It is these settings that need to be changed to garner better search results.
- Underneath “What to Search” click the option that’s called “Always search file names and contents”.
The default settings in Windows will always completely ignore the content of files. By making this simple modification to your search settings the search results will be much more accurate and relevant.
Search Content in Windows 7 Search
You will typically use desktop search to find a file or a program by simply typing in the name of what you’re looking for, and getting the proper results back. Did you know that in Windows 7 you can also search for file contents? By default it is only going to work with specific types of files, but you can change those settings and have your search include plenty of other text-based files. Here’s how you can search content of files in Windows 7:
- Open the Control Panel
- Click to open Indexing Options
- Within the Indexing Options window, click on the button that says Advanced
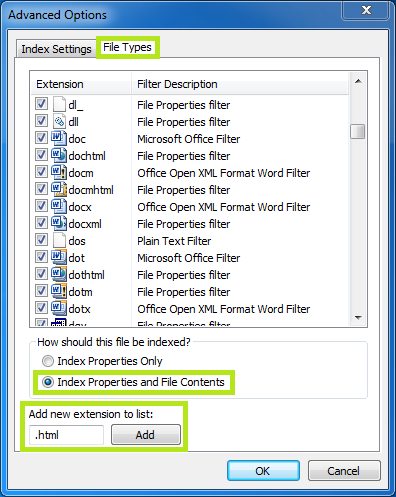
- Click on the tab that says File Types
- Here you can check all the file types that you want to search the contents of.
Don’t forget to check off where it says “Index Properties and File Contents”

This should have Windows search the contents of the file types you have selected. Note that if there was a file type that wasn’t in the list, you can go back to the list of file types and at the bottom, there will be a line that says “Add New extension to list:”. Below it you can type an extension in that you would like to add. This will allow Windows to use a plain text filter to search contents.
Index Settings
Windows 7 once again falls short with the default index settings. In the case of indexing in Windows, it will only index what Windows considers obvious choices or locations. This is an issue since most people move files and folders around all the time.
- Open the start menu, type “indexing options” and once again click the first entry that shows up.
- Click the “modify” button in the dialog box.
- Now you can add any local drives that you normally store your files in.
- While still in the Indexing Options box, open “advanced options”.
- From here you can include encrypted files in your index.
- You can also pick the location that Windows 7 stores its index files.
With the settings all changed and tweaked to your liking, the search results should be a lot better. Test it out a few times, and watch the speed and accuracy change for the better.
Happy searching!


Leave a Reply