Data Preparation: Convert Your Contacts Into a PST File
The Personal Storage Table (PST) file format is used to store data in Outlook and other Microsoft applications. Contacts in such a file are in the proper format to be easily imported into Outlook. It is especially recommended when transferring contacts from another Outlook account or computer, or when transferring all Outlook items such as contacts, appointments, email, and tasks.
To transfer your contacts into a .pst file, follow these simple steps:
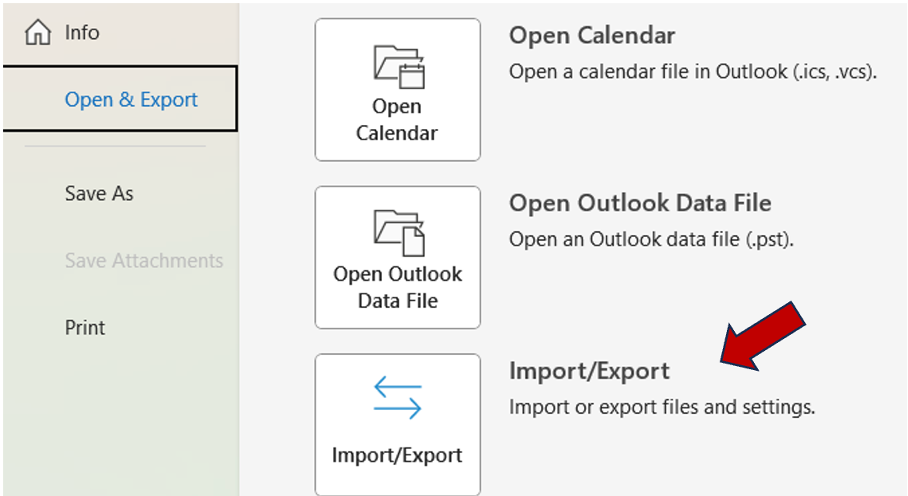
Step 1: Click File, then Open & Export > Import/Export.
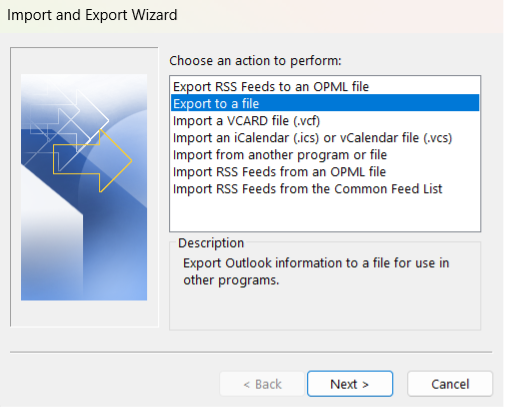
Step 2: In the pop up Import and Export wizard, click Export to a file and Next.
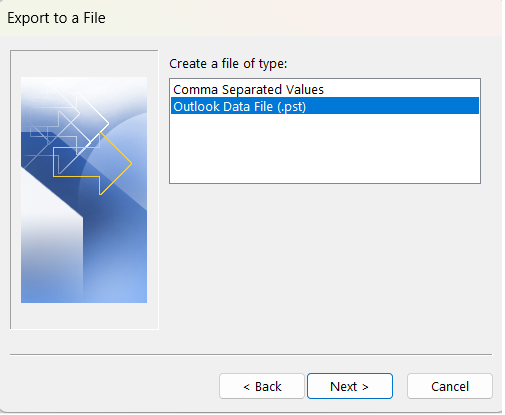
Step 3: Select Outlook Data File (.pst) and Next.
Step 4: Within your email account, select the Contacts folder and check the Include subfolders box at the bottom.
Note: If you’d like to export contacts in categories, click on the Filter… button . In the More Choices tap, you can click Categories and select the accoding ones.
Note: If you’d like to transfer all items, simply press the name of the email account at the top.
Step 5: Click Browse on the right, then save and name the file.
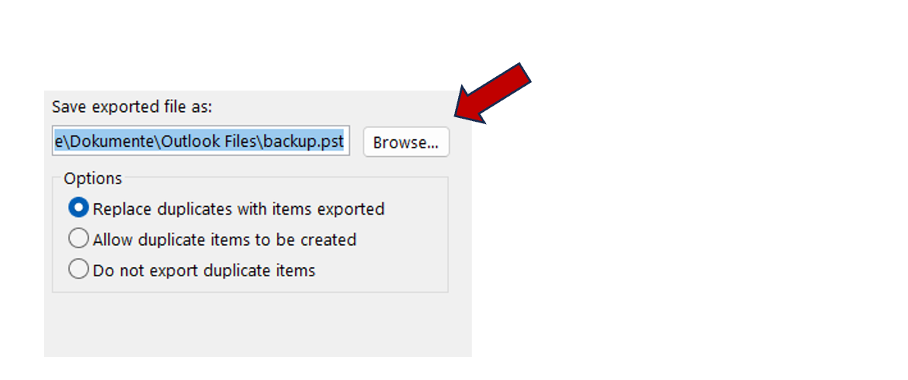
Step 6: You have the option to protect your .pst file with a password. If you do not like to do so, simply press Ok and then Finish.
Do not waste time searching for contacts or documents: Lookeen will search your whole desktop in no time!Import Contacts to Outlook from a PST File: Step-by-Step Instructions
Step 1: Open Outlook, select file, then Open & Export.
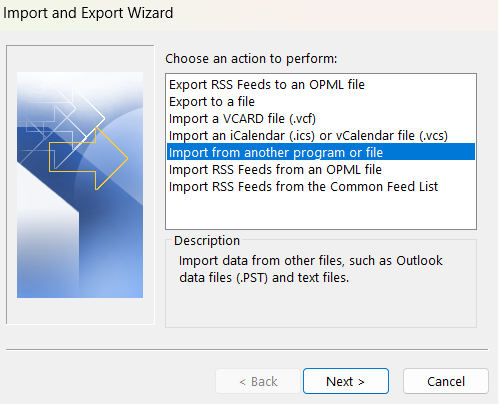
Step 2: In the pop-up window, select Import from another program or file and then click Next.
Step 3: Select Outlook Data File (.pst) and then Next.
Step 4: Click on the Browse button on the right and select the according .pst file.
Note: Within Options, Outlook enables you to choose how to deal with duplicates of the imported contacts.
Step 5: You may have to enter your password.
Step 6: Under Select the folder to import from, you may want to import the whole Outlook data file or select subfolders like Contacts only.
Step 7: At the bottom of the pop-up you may also want to change the target folder to import the items into.
Step 8: Press Finish.
Data Preparation: Convert Your Contacts Into a CSV File
Contact information is usually in the CSV format (Comma Separated Values) when kept in a spreadsheet program like Excel or exported from another email provider. Such files can be imported with a few adjustments:
· In case your contact details contain characters nonexistent in the English alphabet, avoid importing mistakes by exporting contacts into a CSV UTF-8 file.
· Make sure that values in the CSV file are separated by commas, because only commas are supported as field operators. Thus, you may need to replace delimiters like semicolons with commas.
Desktop search solution Lookeen will find any contact in seconds!Import Contacts to Outlook From a CSV File: Step-by-Step Instructions
Step 1: Click File in the upper panel, then Open & Export > Import/Export.
Step 2: In the popup window Import and Export Wizard, click Import from another program or file, then press Next.
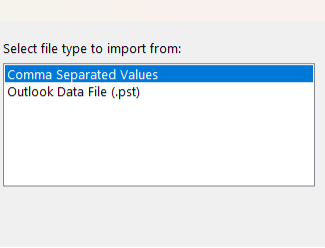
Step 3: Click Comma Separated Values and then Next.
Step 4: Selecting Browse on the right enables you to search for the CSV file you’d like to import.
Note: Within Options, Outlook enables you to choose how to deal with duplicates of the imported contacts.
Step 5: In case you’d like to make sure that the map’s fields are mapped to the correct Outlook fields, select Map Custom Fields on the right.
Step 6: Click Finish.
Outlook will transfer your contacts instantly, though it may take a few minutes. Your contacts, on the other hand, should appear among your existing contacts. Let’s discuss any questions or comments in the comments section!
See you soon,
Aline & the Lookeen team


Leave a Reply