What Options do you have with the Sweep Tool
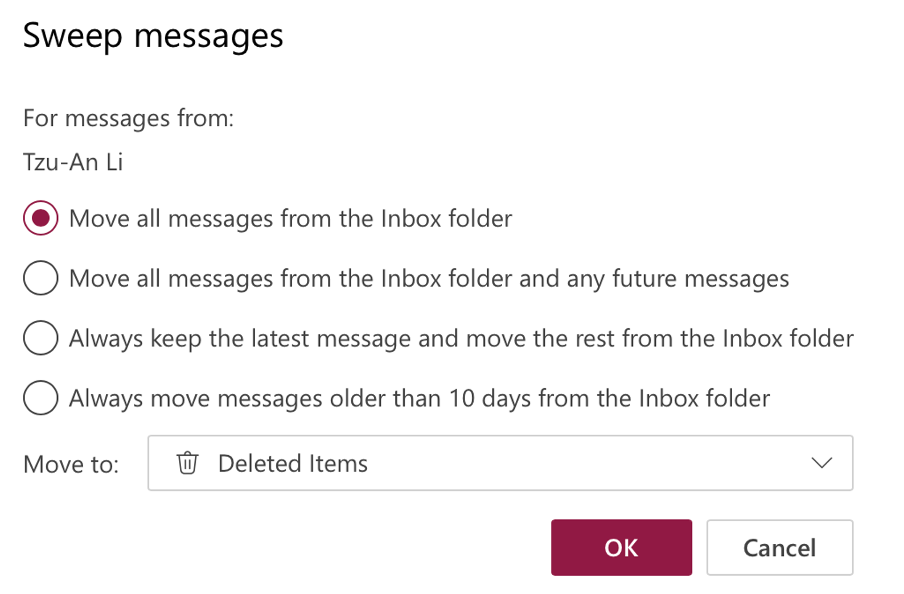
Outlook offers you customization of the sweep rule to meet your needs best. Thus, you can decide:
- Which messages do you want to be moved
- What folder the messages should be moved to

- Move all messages from the Inbox folder
In case you would like to free up your inbox completely, the sweep tool takes care of it, and you do not have to select each message individually. For instance, you can create a folder for very important emails and select the appropriate contacts. The sweep function will put all the messages from your inbox into the folder. This comes in handy, especially if you have finished a project or want to organize your Outlook at the end of the year.
It is also possible to delete all messages in your inbox. Simply run the sweep tool and move all to the deleted items folder. However, it is essential that you keep the overview of where you move emails to and avoid moving important messages to the deleted items folder accidentally.
Stay organized with desktop search solution Lookeen! It will find any email, document or contact in no-time!- Move all messages from the inbox folder and any future messages
If you are used to moving messages to specific folders manually, the sweep rule can be a powerful tool for you to automate the process. Moreover, it could clean all your inboxes every 24 hours, and you could specify the folder they will be moved to. This might help you to stay better organized with your inbox. In this case, you can use the rule “Move all messages from the inbox folder and any future messages.”
- Always keep the latest message and move the rest from the inbox folder
This option allows you to keep the latest messages of a sender in your inbox while moving the previous ones into a specified folder automatically. It can be helpful to avoid a clogged inbox while not risking losing important messages. It might be especially significant when dealing with a timesheet system or reminder emails.
- Always move messages older than ten days from the inbox folder
If you spend a significant amount of your day deleting emails you don’t need from your inbox, the fourth possibility of the sweep tool might be a helpful option for you. It deleted all emails you haven’t dealt with within the past ten days, and you do not intend to deal with those emails at all.
How to use the Swipe Tool in Outlook
Step 1: Log in to your Microsoft browser (via web browser).
Step 2: In your Inbox, select the email of a sender you want to avoid getting messages from.
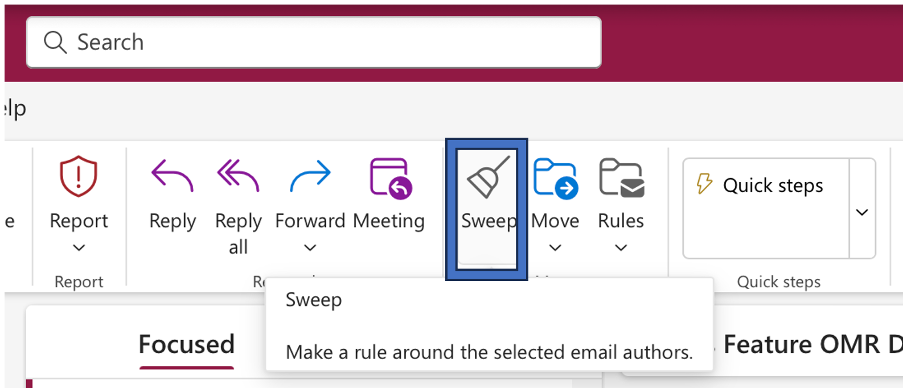
Step 3: You now have the option to select “Sweep” in the toolbar.

Step 4: Select the option that best suits your needs from the pre-configured actions. Next, specify which folder to move the sender’s messages to.
Step 5: Click OK.
You can combine different features and highly customize the sweep rule, making it a helpful tool in Outlook. Do you use the sweep function already? Let us know in the comment section.


Leave a Reply