How to Add Individual Contacts in Outlook
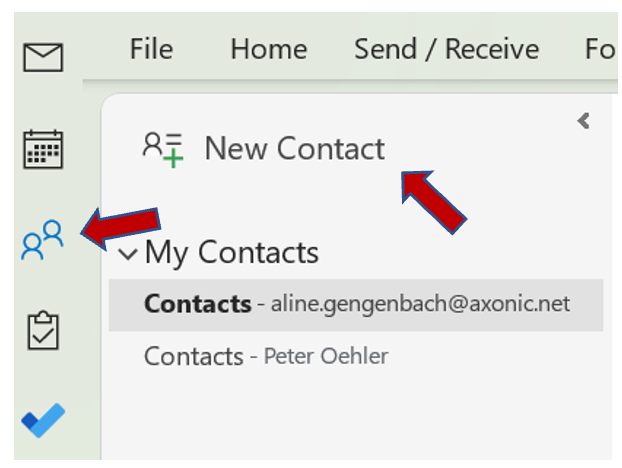
Step 1: Open Outlook and select “People” in the ribbon.
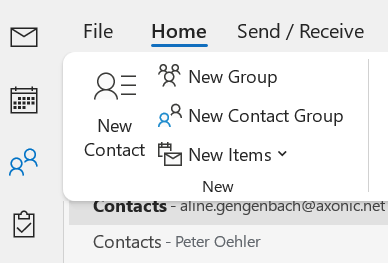
Step 2: Select “New contact”.

Step 3: Add details like the contact’s job title or company.
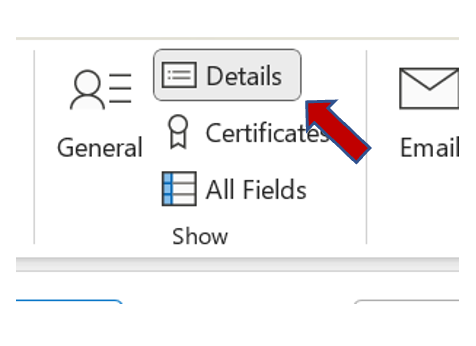
Note: Click “Details” in the top ribbon to add additional information.

Step 4: Select “Save & Close”.
Note: If a person you’d like to add to your contacts sent you an email, you can store the contact’s information directly from your inbox. Click on the corresponding name and click “Add to Contacts” in the “Contact” tab in the ribbon.
How to Organize your Contacts in Outlook
With a growing contact list, efficiently categorizing your contacts can be critical for smart email management. Outlook allows you to create contact lists and categorize them based on type and relationship. You might want to keep customers, colleagues, and providers separate. They can be organized in Outlook into groups, lists, and categories.
For better email organization and management: desktop search solution Lookeen!Categorize Your Outlook Contacts
You might be interested in learning how to categorize contacts in Outlook.
Step 1: Open Outlook and click the “View” tab.
Step 2: Select “Categorize” in order to manage and create them.
Step 3: Select “People” to add labels to contacts.
Create Contact Lists Step-by-Step
By categorizing your contacts into separate lists, you can send messages to all group members at the same time. As a result, email addresses in your contact lists are not linked to your saved contacts.
Step 1: Press the people icon in Outlook.
Step 2: On the upper left, select “New Contact” and then “New Contact List”.

Step 3: You may now add contacts to the list. However, Outlook is not a marketing app. Thus, for massive campaigns, you may want to use external marketing tools. You’ll find some recommendations here.
Note: Once you’ve created a new folder for your contact list, you can drag and drop contacts into it.
How to Edit Contacts in Outlook
Step 1: Go to your contact list and right-click on the contact you’d like to edit.
Step 2: Make changes and edit the contact.
Step 3: Select “Save & Close”.
What are your best strategies to organize your contacts on Outlook? Let’s discuss in the comment section!
See you soon,
Aline & the Lookeen team


Leave a Reply