How to Share Your Outlook Calendar with Individual People (via Desktop App)
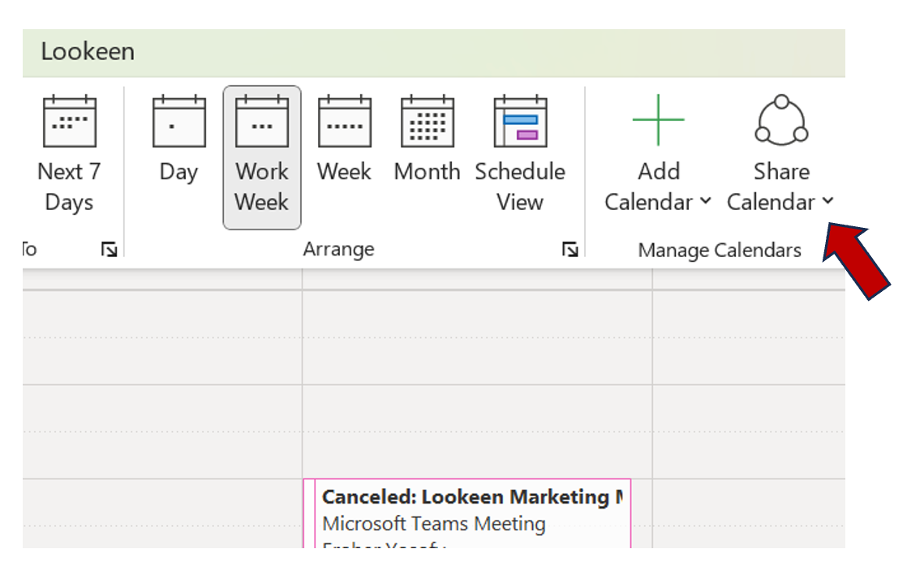
Outlook makes it simple to share your calendar with others in your organization. Your coworkers will be able to add your calendar directly to Outlook or Outlook web. As a result, you can select the permissions you want to grant to your calendar, allowing you to view or edit it directly. Furthermore, you can delegate the other person to accept meeting requests on your behalf.
Unlike publishing your calendar, sharing it individually allows you to manage each share separately and adjust allowance settings as needed. Note: Keep in mind that your office account may be limited due to your organization’s configurations.

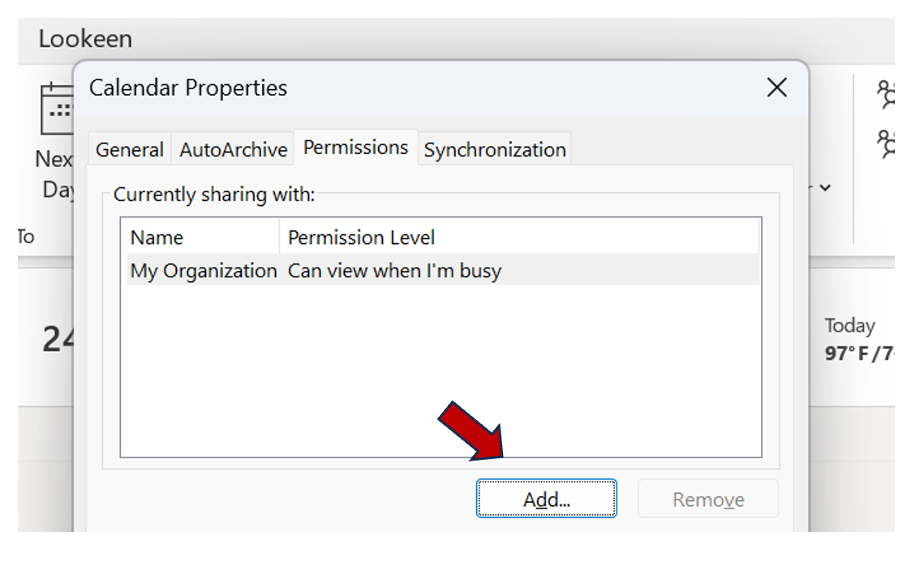
Step 3: In the appearing “Calendar Properties dialog box” you can add the users you want to grant access to your calendar. Simply press “Add” and select accordingly from your contact list.

Step 4: You are now able to assign permissions for each person you want to share your calendar with. You can choose between
- Can view when I’m busy
- Can view titles and locations
- Can view all details
- Can edit
- Delegate
Step 5: Click “Apply” and then ”Ok”.
Now, an email will be sent to the appropriate person with an invitation, which they can accept or reject. They can then find your calendar under “shared calendar” in their Outlook calendar view. Furthermore, they can view it separately or in Overlay Mode for direct comparison.
Find every appointment, task, message, or contact in seconds with the ultimate desktop search solution Lookeen!
How to Publish Your Calendar Online
Outlook also allows you to publish your calendar so that anyone with the appropriate link can view it. Remember that removing the publishing link will cause it to stop working for everyone, regardless of the time you granted access to your calendar. As a result, if you need to customize settings for each person, you should share the calendar as described above. However, it may be more efficient to have a single link that you can easily share with anyone:
Step 1: Click “Settings” and then “View all Outlook settings”.
Step 2: Click on the “Calendar” icon and then select “Shared calendars”.
Step 3: Choose the calendar you’d like to share in the “Publish a calendar” pop-up and select “Can view all details”.
Note: if you only have one calendar setup, you do not need to choose and it’s simply called “Calendar”.
Step 4: Click “Publish”.
Following these instructions will result into two links: an HTML and an ICS link.
- The HTML link: allows people with the link to view your calendar in a browser separately to their own calendar. This might be particularly reasonable when embedding the link on a website for public access.
- The ISC link: grants people to import your calendar into their calendar programs. It is suitable for most calendar apps like Yahoo! or Apple calendar.
Do you share your calendar with others, and what are your thoughts on calendar publishing? Let’s talk about it in the comments!
See you soon,
Aline & the Lookeen team


Leave a Reply