Assign Tasks to Other Team Members

Individual tasks may not be shareable; however, task lists can be shared with team members and others. Simply grant them access to the relevant list and enable viewing and editing. Click “Share list” after selecting the name of the list you want to share.
Finally, from your contacts, add the people you want to share it with. You can also directly assign a task to an employee, team member, or partner who will be responsible for completing it.
Attach Files to Your Tasks
You can easily attach files to your tasks in Outlook. Simply click “Add a file” and then navigate to the appropriate document or image. This may be especially useful when delegating tasks to other team members. In addition, Microsoft 365 allows you to paste a link to the file in the “Add note” section.
Display Tasks in the Outlook Calendar
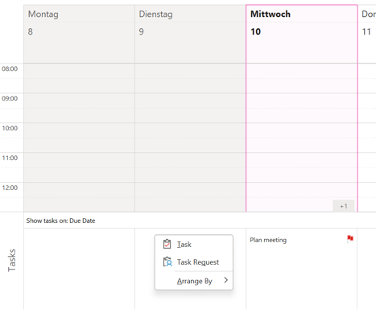
Outlook allows you to view tasks in your Outlook calendar to better overview your upcoming tasks. Individual to-dos with due dates are then clearly displayed in a separate taskbar below the calendar dates.
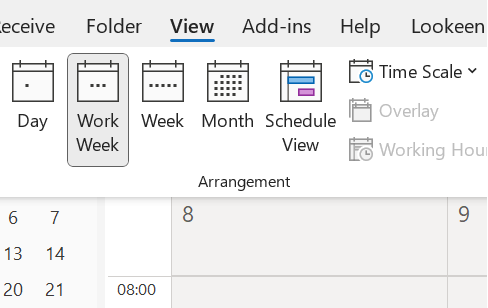
Step 1: Click on the calendar icon on your left side or the bottom of your inbox. In the calendar section select “View” and then “Work Week”.

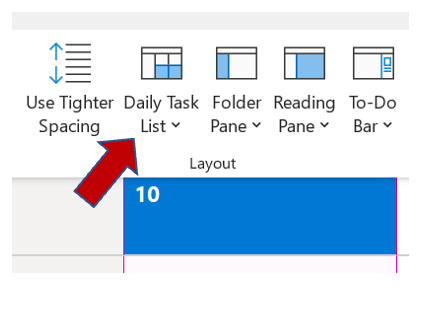
Step 2: Then click on “Daily Task List” under the “Layout” section and select “Normal” in the popup.

Step 3: The “tasks” area is now displayed under the calendar entries. The tasks due on this day appear at the bottom.

Categorize Your Tasks
The categorize function may assist you in locating specific types of tasks. Outlook not only provides default categories, but you can also create your own and assign colors to them. Furthermore, Outlook can show you smart lists such as “My day,” which only shows tasks for the day, or other categories such as “Important,” “Planned,” or “Flagged Emails.”
Separate Appointments, Tasks, and Notes
There is a golden rule for dealing with the variety of daily tasks and information: separate appointments, tasks, and notes:
- Appointments: concrete date & time
Enter all appointments in the Outlook calendar.
- Task: due date but no specific time to finish the task given
Enter all tasks in the Outlook Todo.
- Note: no specific date or time
Notes and unspecific ideas can be stored in Outlook notes or, even better, in Outlook partner program OneNote.
Do not waste time with the search for messages, documents or contacts; use the search feature Lookeen!Status Updates of Tasks

Use the “status update” and “percent complete” features to stay on track with your tasks and gain a better understanding of your work completed and work in progress. For example, if you are halfway through a task, you can mark it with 50% and the label “In Progress.” Other labels available include “Waiting” and “Someone Else” within others.
Time Tracking of Tasks
Outlook allows you to track the time spent on tasks; this is especially useful for freelancers or anyone who charges by the hour. To record your time spent, select the field “Total work”, “Actual work”, or both.

What are your favorite features for organizing your tasks in Outlook? Let us know in the comment section!
See you soon!
Aline & the Lookeen team


Leave a Reply